本部分的实现代码,见 07_Camera

关于摄像机的实现,实际上就是调整观察矩阵的问题。为了确定观察矩阵,需要确认四个信息:

  • 摄像机的位置
  • 摄像机的前方
  • 摄像机的右方
  • 摄像机的上方。

这四个信息构成了 观察矩阵 ,也可称为 LookAt 矩阵。

 LookAt =[RxRyRz0UxUyUz0DxDyDz00001][100Px010Py001Pz0001]\text { LookAt }=\left[\begin{array}{cccc} R_x & R_y & R_z & 0 \\ U_x & U_y & U_z & 0 \\ D_x & D_y & D_z & 0 \\ 0 & 0 & 0 & 1 \end{array}\right] *\left[\begin{array}{cccc} 1 & 0 & 0 & -P_x \\ 0 & 1 & 0 & -P_y \\ 0 & 0 & 1 & -P_z \\ 0 & 0 & 0 & 1 \end{array}\right]

其中RR表示摄像机的右方,UU表示摄像机的上方,DD表示摄像机的前方,PP表示摄像机的位置。

需要注意的是,虽然说观察矩阵是为了表现摄像机。但因为观察矩阵最后是与 Model 矩阵相乘的,因此观察矩阵要表达的变换是与摄像机要表达的变换相反的,例如摄像机后退三米相当于场景前进三米。也因此,LookAt 矩阵中,旋转矩阵是经过了转置的,位移矩阵是取了负的。

GLM 中提供了 LookAt 函数的接口,调用如下:

1
2
glm::mat4 view(1.0f);
view = glm::lookAt(glm::vec3(0.0f, 0.0f, 3.0f), glm::vec3(0.0f, 0.0f, 0.0f), glm::vec3(0.0f, 1.0f, 0.0f));

lookAt 函数需要三个向量:

  • 摄像机的位置
  • 摄像机的目标
  • 摄像机的上方。

前两个参数可以确定摄像机的前方,通过摄像机的前方和第三个参数摄像机的上方,可以叉乘获得摄像机的右方。

#键盘控制摄像机位置

可通过函数 glfwGetKey 获取键盘按键信息。在绘制循环函数中去检查输入信息,并根据输入信息对摄像机的位置进行调整,再根据摄像机的位置调整观察矩阵,即能满足键盘控制摄像机位置的效果:

1
2
3
4
5
6
7
8
9
10
11
12
13
14
15
16
17
18
19
20
21
22
23
24
25
26
27
28
29
30
31
32
33
while (!glfwWindowShouldClose(window))
{
processInput(window);
...
glm::mat4 view(1.0f);
view = glm::lookAt(cameraPos, cameraPos + cameraFront, cameraUp);
...
}

...

float lastFrameTime = 0.0f;
float currFrameTime = 0.0f;
float deltaTime = 0.0f;
void processInput(GLFWwindow *window)
{
currFrameTime = glfwGetTime();
deltaTime = currFrameTime - lastFrameTime;
lastFrameTime = currFrameTime;

float cameraSpeed = 2.5f * deltaTime;
if (glfwGetKey(window, GLFW_KEY_W) == GLFW_PRESS)
cameraPos += cameraSpeed * cameraFront;
if (glfwGetKey(window, GLFW_KEY_S) == GLFW_PRESS)
cameraPos -= cameraSpeed * cameraFront;
if (glfwGetKey(window, GLFW_KEY_A) == GLFW_PRESS)
cameraPos -= glm::normalize(glm::cross(cameraFront, cameraUp)) * cameraSpeed;
if (glfwGetKey(window, GLFW_KEY_D) == GLFW_PRESS)
cameraPos += glm::normalize(glm::cross(cameraFront, cameraUp)) * cameraSpeed;

if (glfwGetKey(window, GLFW_KEY_ESCAPE) == GLFW_PRESS)
glfwSetWindowShouldClose(window, true);
}

#鼠标控制摄像机角度

首先需要了解摄像机角度的定义,对于摄像机有三个术语 pitch, yaw, roll分别描述绕着x,y,zx,y,z三个轴的旋转:

pitch, yaw, roll

通量来说,只需要修改 pitch 角和 yaw 角度即可。可使用鼠标的水平平移来修改 yaw 角度,鼠标的前进后退来修改 pitch 角度。

通过 pitch 和 yaw 角度,可以计算出摄像机的前方向。根据前方向,和世界坐标的上方向(0,1,0)(0,1,0),可以计算出摄像机的右方向。再根据摄像机的前方向,摄像机的右方向,可求得摄像机的上方向。

首先只考虑 yaw 角度,根据示意图,可以很快的计算出 yaw 角度对于摄像机前方向的贡献:

1
2
3
glm::vec3 direction;
direction.x = cos(glm::radians(yaw)); // Note that we convert the angle to radians first
direction.z = sin(glm::radians(yaw));

然后计算 pitch 角度。想想物体躺在 X 轴上,pitch 角度为θ\theta,y 轴上分量为 sinθ\sin\theta,x 轴上分量为cosθ\cos\theta。同理,当物体躺在 Z 轴上时,y 轴上分量为 sinθ\sin\theta,z 轴上分量为cosθ\cos\theta。示意图代码如下:

1
2
3
direction.x = cos(glm::radians(yaw)) * cos(glm::radians(pitch));
direction.y = sin(glm::radians(pitch));
direction.z = sin(glm::radians(yaw)) * cos(glm::radians(pitch));

结合可得:

1
2
3
4
5
glm::vec3 direction;
direction.x = cos(glm::radians(yaw)) * cos(glm::radians(pitch));
direction.y = sin(glm::radians(pitch));
direction.z = sin(glm::radians(yaw)) * cos(glm::radians(pitch));
cameraFront = glm::normalize(direction);

为了保证初始的cameraFront指向-z方向,yaw的初始值应该取-90°

在获得了 cameraFront 后,可利用叉乘获得 cameraRightcameraUp

1
2
3
4

cameraRight = glm::normalize(glm::cross(cameraFront, WorldUp)); // normalize the vectors, because their length gets closer to 0 the more you look up or down which results in slower movement.

cameraUp = glm::normalize(glm::cross(cameraRight, cameraFront));

可以通过函数 glfwSetCursorPosCallback 设置鼠标移动的回调,并在回调中根据鼠标的移动,调整 yaw 和 pitch 角,并进一步更新摄像机的三个方向信息。并且可以通过函数 glfwSetMouseButtonCallback 设置仅当鼠标右键按下时,才对鼠标的移动进行操作。

1
2
3
4
5
6
7
8
9
10
11
12
13
14
15
16
17
18
19
20
21
22
23
24
25
26
27
28
29
30
31
32
33
34
35
36
37
38
39
40
41
42
43
44
45
46
47
48
49
50
51
52
53
54
55
56
57
58
59
60
glfwSetCursorPosCallback(window, mouse_callback);
glfwSetMouseButtonCallback(window, mouse_button_Callback);

bool firstMouse = true;
double lastX = 0.0, lastY = 0.0;
double mouseSensitivity = 0.05;
float yaw = -90.0f;
float pitch = 0.0f;
bool ClickDown = false;

void mouse_callback(GLFWwindow *window, double xpos, double ypos)
{
if (!ClickDown)
return;

if (firstMouse)
{
lastX = xpos;
lastY = ypos;
firstMouse = false;
}

float xoffset = (xpos - lastX) * mouseSensitivity;
float yoffset = (lastY - ypos) * mouseSensitivity; // reversed since y-coordinates go from bottom to top

lastX = xpos;
lastY = ypos;

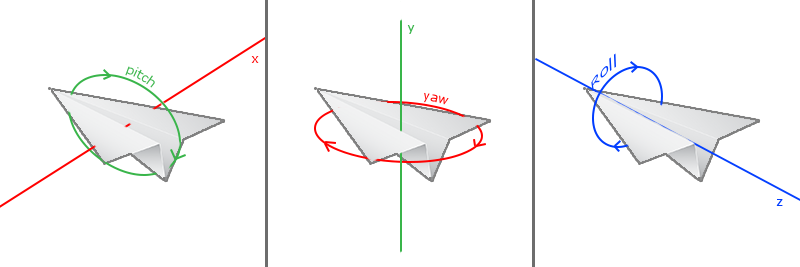
yaw += xoffset;
pitch += yoffset;

if (pitch > 89.0f)
pitch = 89.0f;
if (pitch < -89.0f)
pitch = -89.0f;

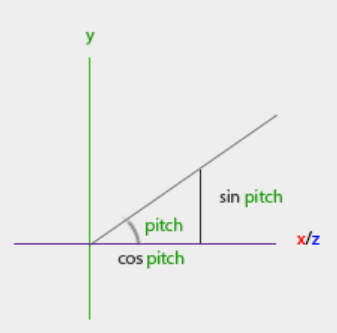
glm::vec3 front;
front.x = cos(glm::radians(yaw)) * cos(glm::radians(pitch));
front.y = sin(glm::radians(pitch));
front.z = sin(glm::radians(yaw)) * cos(glm::radians(pitch));
cameraFront = glm::normalize(front);
// also re-calculate the Right and Up vector
glm::vec3 cameraRight = glm::normalize(glm::cross(cameraFront, glm::vec3(0, 1, 0))); // normalize the vectors, because their length gets closer to 0 the more you look up or down which results in slower movement.
cameraUp = glm::normalize(glm::cross(cameraRight, cameraFront));
}

void mouse_button_Callback(GLFWwindow *window, int key, int action, int mode)
{
if (key == GLFW_MOUSE_BUTTON_RIGHT)
{
if (action == GLFW_PRESS)
{
ClickDown = GL_TRUE;
}
else if (action == GLFW_RELEASE)
{
ClickDown = GL_FALSE;
}
}
}

在上述代码中变量 firstMouse 是为了避免程序一开始因为 lastX, lastY 初始值为 0 导致的跳变。同时为了避免颠倒情况,将 pitch 的范围限制在 8989-89 \sim 89的范围内。

#结果与源码

此时即可以通过键盘的 WASD 控制摄像机的位置,通过按下鼠标右键并移动鼠标控制摄像机的角度。

Result